Welcome to SrishCodes where I teach you interesting tech concepts that you should know about as a current or aspiring software developer. In this article I will be sharing with you lesser known HTML tags. Before you get started with this article, ideally you should have some basic knowledge of HTML. For starters, knowing what are HTML tags and HTML attributes.
<datalist> and <option>

The first tags I am going to introduce are the datalist and option tags. These are used in forms or as input from the user in a select dropdown for the user to choose between a few options. Using these tags, we can build a select dropdown using just HTML and no fancy JavaScript or external libraries.
<datalist id="fruits">
    <option value="apple">
    <option value="orange">
    <option value="banana">
    <option value="strawberry">
</datalist>
Lets go through an example. I am going to create a new datalist of, lets say, fruits. And here I am going to have four simple fruits that I can list as options for the user. But there is no select dropdown being shown on the screen yet. Why is that?
That is because you also need an input element to show that this list is used as input for the user. Let's add an input tag here, and add the id of the datalist as an attribute list in our input tag. Now this is optional but simply for user experience let's also add a label.
<label for="fruits">Choose a fruit from the list:</label>
<input list="fruits" name="fruit" id="fruit">
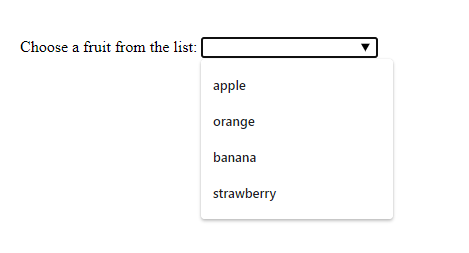
So as you can see here I have a normal looking input box but when I hover over it I can see a down arrow. And when I click on the input box, I can see the list of fruits I added.


Another handy feature about this tag is that it allows the user to type in the input box to filter out items in the list. For example if I type 'p' here and since only 'apple' contains that character 'p', it is going to only display apple as an option.

This is especially useful if you have a long list of options that the user can then type to filter out based on their preferences or if they don't want to do that they can scroll and view all the options in the list.
<output>
The next tag I am going to introduce to you is the output tag. It is used to show the result of a calculation. Let's start off with a simple addition example.
Lets first add a form tag and then add two input tags. Now these are going to be the two numbers that I actually use to add. I am going to set the type of input as 'number' and add an id and name for both inputs. I can also set an initial value as 10.
<form oninput="result.value=a.valueAsNumber + b.valueAsNumber">
    <input type="number" id="a" name="a" value="10" />
    <input type="number" id="b" name="b" value="10" />
</form>

I can then use the output tag, add a name attribtue and then use the for attribute. for attribute is needed to list all the other elements that contributed to the calculation. In our case I am going to be adding 'a' and 'b' in this attribute. The last thing we will need is an oninput attribute. Now what I am going to add here is the actual mathematical calculation, or in our case this is addition.
<form oninput="result.value=a.valueAsNumber + b.valueAsNumber">
    <input type="number" id="a" name="a" value="10" />
    <input type="number" id="b" name="b" value="10" />
    <output name="result" for="a b"></output>
</form>
So I am going to set the value of this output element to the sum of the values of the two inputs. In order to do that I am first going to get their value as a number and then use the '+' sign to add them together just like elementary school.
And now when we try changing the value of any of these two inputs we can see the output is automatically recalculated using the oninput function.

As you can see below, it also works for decimal values.

However, if you remove any one of the values entirely, you get this NaN which means Not a Number.

Since one of the inputs is empty, this means the HTML is not able to deduce the numeric value of the input. Although most other non numeric characters are not allowed in this number input field, the same NaN appears if you enter a non numeric character like 'e'. Again, the HTML is not able to deduce the numeric value of 'e'.

Now an important part to note here is that if you simply use value instead of valueAsNumber, you will get the value as a string and that is not going to give you the correct result as the values will be concatenated like a string instead of being summed together. Hence, always remember to use valueAsNumber for mathematical functions and value for string operations.
The second thing to note is that you see initially there is no value provided in the output. This is because the value is only calculated on input, as defined by the oninput attribute. In order to add an initial value you can set a value in between the output tags. The rest of the stuff remains the same, so the value of the output is still recalculated every time the value of any of the inputs changes.
<form oninput="result.value=a.valueAsNumber + b.valueAsNumber">
    <input type="number" id="a" name="a" value="10" />
    <input type="number" id="b" name="b" value="10" />
    <output name="result" for="a b">20</output>
</form>

The last thing to note is that the value and name of the output tag is not submitted during the form submission. This is purely something that is shown to the user.
And that's all for output! This is a very handy tag that you can use without using any additional JavaScript.
<template>
Now lastly we have the template tag. According to w3schools, it is used as a container to hold some HTML content hidden from the user when the page loads.
We are going to start off by creating a template tag with a div, that is going to have a h2 element and a p tag with some text in it, and lets also put some text outside.
<template>
    <div>
        <h2>This is a template</h2>
        <p>Smaller text explaining stuff here</p>
    </div>
    <h1>This text is outside</h1>
</template>
The benefit of using template is that this HTML is not actually going to show up on our webpage since the template is not rendered. No images are loaded and no script is run until the template is used.
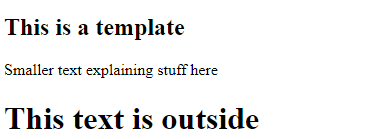
How do I actually use templates then? Well we must first activate the template using JavaScript. We are first going to access the template using the query selector, and then access the content of the template and pass true to the cloneNode function. Now what is this going to do is access all the child elements inside the template and then we can append it to our webpage.
<script>
    const template = document.querySelector('template');
    const content = template.content.cloneNode(true);
    document.body.append(content);
</script>

Also do take note that nested templates require that their children also be manually activated. Hence if I have another template tag inside, still only the outer tag is rendered.
<template>
    <div>
        <h2>This is a template</h2>
        <p>Smaller text explaining stuff here</p>
    </div>
    <template>
        <small>This is in nested tag</small>
    </template>
    <h1>This text is outside</h1>
</template>

Now you might be thinking why use template instead of a CSS property with style as hidden?
<div hidden>
    <h2>This is a template</h2>
    <p>Smaller text explaining stuff here</p>
</div>
<h1 hidden>This text is outside</h1>
Yes in both cases the block of HTML is not rendered however in the case of using hidden and you cant see the code on the webpage, but a network request is still made, for example to get images.
And that was all for this now! If you are still reading, make sure to follow me for more as I have some exciting stuff coming up. Until next time!