

Hi everyone, welcome back to SrishCodes where I teach you interesting tech concepts that you should know about as a current or aspiring software developer. Today I will be sharing with you about npm.
If you are a JavaScript developer who is keen to find out more about this essential tool, keep reading!
Introduction
npm is the standard package manager for Node.js. It is a tool used in all frontend JS projects to manage downloads of dependencies. Yarn is an alternative to npm.
Components of npm
npm consists of three components:
- Website
The official npm website allows us to find packages, view documentation, share and publish packages.
- Registry
The npm registry is a huge database of almost a million packages. Developers like you and me publish and download packages to and from this registry.
- Command Line Interface (CLI)
The CLI helps us in interacting with npm for managing dependencies. More on this in a little bit.
Installing npm
npm is installed along with Node.js, which can be installed from the official Node.js website. After installation, you can check the version of node and npm using:
node -v
npm -v
package.json
As a general rule, all Node.js projects need to have a package.json file. It is the project manifest file that includes the packages and applications your project depends on, specific metadata about the project and so on. For most JS frameworks like Angular and React, the package.json file comes together with the project skeleton. However if you want to initialize a package.json within your project, you can use the following command:
npm init
You are asked to enter some data like author name, description etc. You can simply press enter for defaults.
{
    "name": "app-test",
    "version": "0.23.67",
    "description": "Testing this app with this package.json file",
    "license": "MIT"
}
You can also quickly create a package.json file using either of the two commands below:
npm init -y
// or
npm init --yes
Semantic Versioning
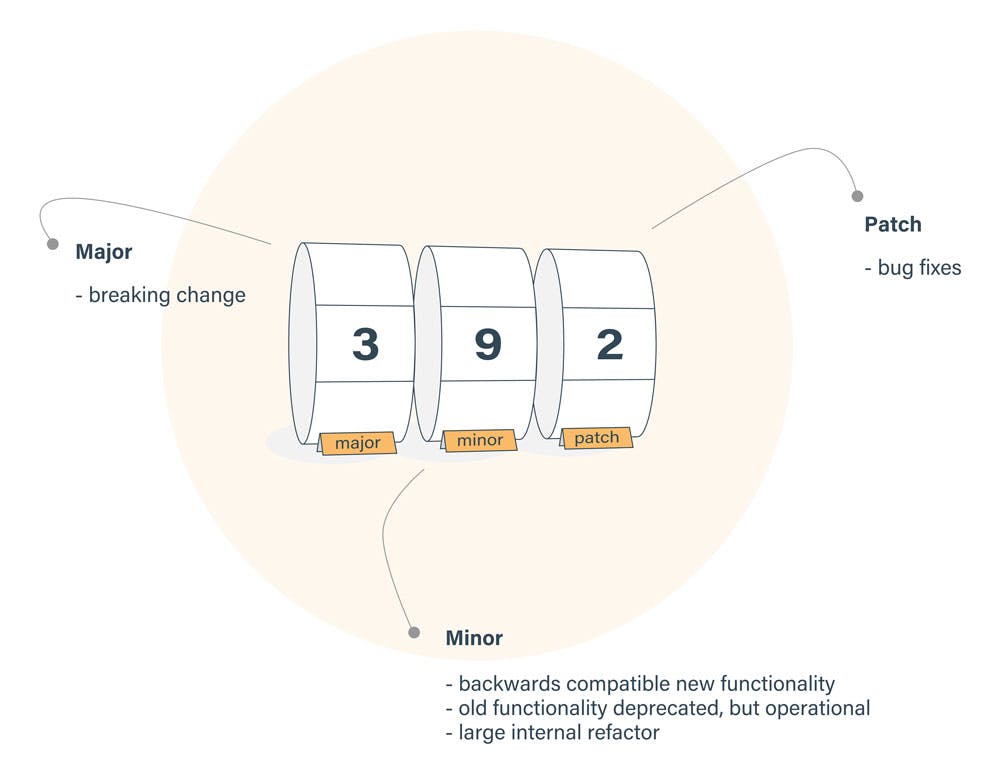
All package versions are represented using three digits. The major, minor and patch as shown in the image above. The major is updated for big changes that generally break the existing code. The minor is updated for every new functionality and the patch is updated for bug fixes.
Properties of Dependencies
- dependencies: bundled together with the app in production and needed to run the app.
- devDependencies: not needed to run the app in production but only during development, eg testing libraries
- peerDependencies: only useful if you are building a library that other Node.js projects will depend on. Projects that install your library should explicitly list these in their
dependenciesordevDependencies - optionalDependencies:
npm installgenerally fails if package you are trying to install cannot be found. However, it will still succeed if the dependency is listed inoptionalDependencies
Installing Dependencies
If a project has a package.json, use the following command to install everything the project depends on. A node_modules folder and a package-lock.json file is created is created (if it does not already exist). The package-lock.json file contains the exact version of the dependencies installed, unlike package.json which contains the semantic version.
npm install
You can add the flag --production to skip devDependencies from the installations.
Installing A Single Package
You can also install a specific package by running:
npm install <package>
You can also add different flags to this command:
-save: installs and adds the package topackage.jsondependencies--save-dev: installs and adds the package topackage.jsondevDependencies-g: installs package globally (only for packages you use in the command line)
To install a specific version of a package, use:
npm install <package>@<version>
You can then use the --save --save-exact flags if you want the exact version specified in your package.json dependencies.
If you are not sure what versions of a package are available, you can use:
npm view <package> versions
Updating A Package
If you want to update all packages or a specific package, use the following commands:
npm update
npm update <package>
To update global packages, you must use -g flag:
npm update <package> -g
Uninstalling A Package
Sometimes you may not need a package anymore. It is not safe to directly remove the package from node_modules folder as it may be used by other dependencies as well. Instead, you can use the command below to safely uninstall the package.
npm uninstall <package>
Similarly, for global packages we must add the -g flag at the end of the above command.
List Installed Packages
To get the list of installed packages, use the command below. This will list all packages including its dependencies.
npm list
Running Scripts
In addition to installing dependencies, npm is also used for running scripts. The scripts property in package.json lets you define custom scripts that you can run using:
npm run <task>
They can be used for various repetitive tasks, and can be written using bash or batch scripts. As shown in the example found in nodejs.dev,
{
  "scripts": {
    "watch": "webpack --watch --progress --colors --config webpack.conf.js",
    "dev": "webpack --progress --colors --config webpack.conf.js",
    "prod": "NODE_ENV=production webpack -p --config webpack.conf.js",
  }
}
Instead of typing those long commands, you can instead run:
npm run watch
npm run dev
npm run prod
Furthermore, the most important reason to use npm run is the ability to access npm package executables. For example, there are various packages that export an executable to ./node_modules/.bin. If these executables are needed for your code to run, you will first need to run these executables.
However, in your package.json scripts npm adds ./node_modules/.bin to the PATH before running the script.
If you do not want default logs to be output to the console when you execute a script, you can add the --silent flag:
npm run --silent <task>
Running the Test Script
If you define a script named "test", you can run it using either of the two commands below:
npm test
// or
npm run test
Making npm test run your entire test suite is a best practice.
{
  "scripts": {
    "test": "echo 'Your tests run here...'"
  }
}
Calling npm Scripts Within Other npm Scripts
{
  "scripts": {
    "test": "echo 'Your tests run here...'",
    "test-run": "npm run test && echo 'Run both scripts!'"
  }
}
Since npm scripts execute in the shell, this format makes sense. Now when you run npm run test-run, the test script is executed first which outputs 'Your tests run here...' and then 'Run both scripts!' is output to the console.
This can be useful if you want to do something before or after a certain script. In this case I want to run the test script before getting the 'Run both scripts!' output.
Pre and Post Hooks
If we want to do stuff before and after a script, we will have to add multiple && to our npm script. This looks messy and cluttered. Luckily, npm has a way to handle this scenario using pre and post hooks. Let me explain this using an example.
"hello": "echo 'Hello there...'",
"prehello": "echo 'I run before hello'",
"posthello": "echo 'I run after hello'",
The 'pre' and 'post' before the script names tell npm to execute before and after the hello script respectively.
Calling Shell or Node Scripts
You can also call shell or node scripts from package.json by adding the lines shown below to your scripts object:
"bash-test": "bash test-run.sh",
"js-test": "node test-run.js"
Adding Arguments to Scripts
Suppose you have a command like this:
curl -X PUT http://yourURLhere.com/put -d '{"arg1":"variableHere"}'
And a test-run.js file that accepts two integers as arguments. Your package.json has a script defined like below:
{
  "scripts": {
    "send-request": "curl -X PUT http://yourURLhere.com/put",
    "js-test": "node test-run.js"
  }
}
You can add arguments to this script as shown below:
npm run send-request -- -d '{"arg1":"variableHere"}'
// or
npm run js-test 2 3
And that was all for this now! If you are still reading, make sure to follow me for more as I have some exciting stuff coming up. Until next time