


Hi everyone, welcome back to SrishCodes where I teach you interesting tech concepts that you should know about as a current or aspiring software developer. Today I will be sharing with you about multithreading in JavaScript, specifically using workers.
As we know, JavaScript is a single-threaded environment, meaning multiple scripts cannot run at the same time. For example, a site that needs to handle UI events, process large amounts of API data and manipulate the DOM cannot handle all of these simultaneously.
Yes you can use setTimeout() or setInterval() and even event handlers to mimic concurrency. Unfortunately, non-blocking does not mean concurrency.
Workers allow you to do things like run long-running scripts to handle computationally intensive tasks in a separate thread without blocking or slowing down the UI or other scripts to handle user interactions. Workers utilize thread-like message passing to achieve parallelism. There are two kinds of web workers - web workers and service workers.
Web workers
Web Workers run in an isolated thread. Hence, the code that they execute needs to be in a separate file. Or you can use the following syntax to add the worker in the same HTML file.
<script id="task" type="javascript/worker">
    // This script won't be parsed by JS engines
    // because its type is javascript/worker.

    // Rest of your worker code goes here.
  </script>
It is important to note that the workers do not have access to the DOM, the window object (as they run in a different global context), the document object and the parent object.
A worker is an object created using a constructor Worker() that runs a named JavaScript file — this file contains the code that will run in the worker thread.
Create and run a web worker
The first thing to do before creating a web worker is to check whether the user's browser supports it (generally supported in every major browser).
if (typeof(Worker) !== "undefined") {
  // Yes! Web worker support!
  // Some code.....
} else {
  // Sorry! No Web Worker support..
}
Then create a new Worker object in your main page. The constructor takes the name of the worker script:
var worker = new Worker('task.js');
The browser then creates a new worker thread which is downloaded asynchronously. The worker will not begin until the file has completely downloaded and executed. If the path to your worker returns an 404, the worker will fail silently. To start the worker, use the following:
worker.postMessage();
Handling communication
Data is sent between workers and the main thread via a system of messages using an event model and the postMessage() method. The data is copied rather than shared. Depending on your browser/version, postMessage() can accept either a string or in more recent versions, a JSON object as its single argument.
Main script:
var worker = new Worker('task.js');

worker.addEventListener('message', function(e) {
  console.log('Worker said: ', e.data);
}, false);

worker.postMessage('Hello World!'); // Send data to our worker.
task.js:
self.addEventListener('message', function(e) {
  self.postMessage(e.data); // Send data back to main thread
}, false);
Instead of self, you can also use the this reference as shown below.
task.js:
addEventListener('message', function(e) {
  postMessage(e.data); // Send data back to main thread
}, false);
There are two ways to stop a worker: by calling worker.terminate() from the main page or by calling self.close() inside of the worker itself.
Subworkers
Workers also have the ability to spawn child workers. This is great for further breaking up large tasks at runtime. However, subworkers come with a few caveats:
- Subworkers must be hosted within the same origin as the parent page.
- URIs within subworkers are resolved relative to their parent worker's location (as opposed to the main page).
You can find an example of spawning of a subworker here.
Use cases
- Prefetching and/or caching data for later use
- Code syntax highlighting or other real-time text formatting
- Spell checker
- Analyzing video or audio data
Security
Local access: Chrome does not allow workers to run locally hence they fail silently. Use
--allow-file-access-from-filesflag to run Chrome for purely testing purposes. This is not recommended for regular browsing.Same Origin: Worker scripts must be external files with the same scheme as their calling page. Thus, a
https:page cannot start worker scripts that begin withhttp:URLs.
You can read the web workers API doc here. A great example of web workers can be found here.
Service workers
Service Workers offer a lot more functionality for creating Progressive Web Apps (PWAs) which give a great experience for offline users or users with slow internet connections. The service worker can be used as a proxy for network events, allowing us to cache resources for offline use. This gives developers complete control over the experience. Whether it is periodic background syncs or push notifications, service workers make this possible on the web.
Service Workers are a special type of Web Worker with the ability to intercept, modify, and respond to all network requests using the Fetch API. Service Workers can access the Cache API, and asynchronous client-side data stores, such as IndexedDB, to store resources.
Creating a service worker
The first thing to do is to check if the service worker API is available. If it is, the service worker at serviceTask.js is registered once the page is loaded. You can call register() every time a page loads without concern; the browser will figure out if the service worker is already registered or not and handle it accordingly.
if ( "serviceWorker" in navigator ) {
    navigator.serviceWorker.register( "serviceTask.js" );
}
As a best practice, place the service worker file in the root of your site, unless you need to reduce the scope of your service worker to the folder that it is placed in.
Service worker life cycle
A service worker has a lifecycle that is completely separate from your web page. Each step triggers an event. You can add listeners to these events to run code to perform an action.
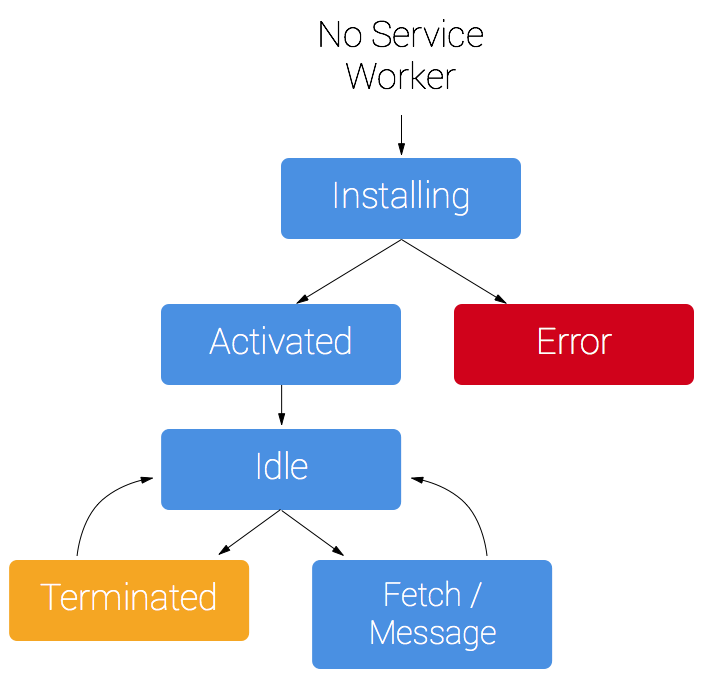
- Register the service worker
- The browser downloads the JavaScript file, installs the Service Worker, and triggers the
installevent. You can use theinstallevent to pre-cache any important and long-lived files, such as CSS files, JavaScript files, logo images etc from your website.
self.addEventListener( "install", event => {
    console.log( "WORKER: install event in progress." );
});
- The service worker is activated, which triggers the
activateevent. Use this event to clean up outdated caches.
self.addEventListener( "activate", event => {
    console.log('WORKER: activate event in progress.');
});
- The service worker is ready to run when the page is refreshed or when the user navigates to a new page on the site. If you want to run the worker without waiting, use the
self.skipWaiting()method during the install event.
self.addEventListener( "install", event => {
    self.skipWaiting();
    // …
});
- The service worker is now running. Once a service worker is in control, it will be in one of two states: either the service worker will be terminated to save memory, or it will handle fetch and message events that occur when a network request or message is made from your page.
Using fetch
The fetch event runs every time the browser attempts to access content within the scope of the service worker.
self.addEventListener( "fetch", event => {
  console.log('WORKER: Fetching', event.request);
  // control if request goes to network, pulls from cache etc
  // based on type and frequency of resource requested etc
});
Here are a few examples for the fetch event:
- If available, return a response from the cache, otherwise fallback to request the resource over the network.
- Fetch a resource from the network, cache a copy, and return the response.
- Allow user's to specify a preference to save data.
- Supply a placeholder image for certain image requests.
- Generate a response directly in the Service Worker.
And that was all for this now! Make sure to leave a comment and follow me for more content. Until next time